It would be nice if everything went exactly as planned. However, we had to find solutions to several problems that arose. Debugging a remote observatory is not for the faint-of-heart. :-)
- Communications problems.
- Roof opening and closing problems.
We are using the Foster AMC-100(V2)2R-1 board for roof control.
This roof control problem has been the most severe problem and would have destroyed my telescope RA gears if the clutch had not worked. The roof has closed on my telescope banging into it at least 10 times now. Should be impossible. Have tried everything to determine the source of the problem.
From my notes one night:
I have all the controls in place with the Foster board and magnetic switches.
Somehow, the roof was able to close while I was photographing M42. Knocked the scope off alignment. Seems to be relatively ok but I am becoming afraid...
Is it possible for the roof motor to trigger all by itself? Sensitivity adjustments? Doesn't seem likely but I don't understand what is happening...
I actually watched this happen a third time tonight while looking at the video stream...
It should be impossible for the "close-the-roof" signal to be given without me giving it.
So that's why I'm wondering if there is another way to trigger roof-close....
I do know that simply pushing the button while in the observatory would bypass all the safeguards... But nobody is there pushing buttons...
I am going to risk more imaging I guess but I am getting pretty frightened...
See the video of the roof closing and opening all by itself through the night even though no one was commanding it to do so here. (This is from a meteor detection camera inside the observatory that is pointed toward the sky. We used HandyAvi to do Motion Detection. Motion from moths and from the roof opening and closing was captured. We had the internal observatory light on so the camera could see the roof.)
In late June 2012, I replaced the USB/Serial cable that I was using to talk from my observatory computer to the Foster board. It might somehow have been that that was causing the unexpected roof closures. Testing since that time has not shown another unexpected roof closure. But I am not totally confident. This has really been creepy and potentially highly destructive to my telescope. The last time it happened, it scraped the magnet off of my telescope that tells when the scope is in the "safe" position:
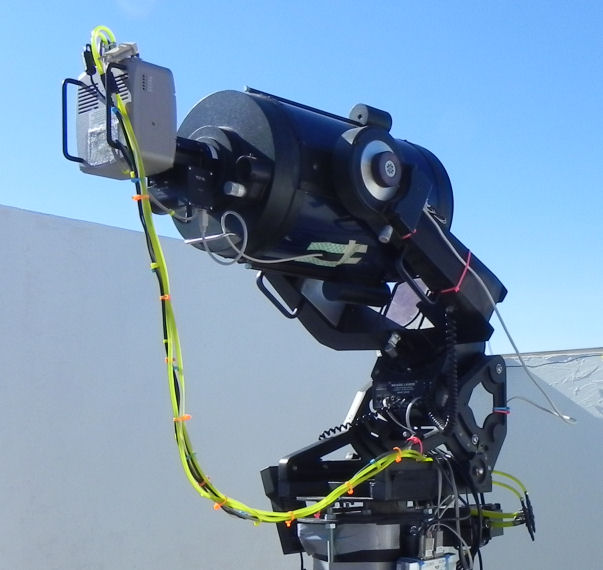
You can see where the roof left scrape marks on the scope. The little patch of white on the telescope tube is where the magnet that got scraped off had been mounted.I moved the magnet and sensor from the West side of the scope to the East side so that it cannot be scraped off again if the roof should again close on my telescope when it is pointing up to the sky.
Unexpected roof closures are a really tough problem that I have been unable to solve or understand completely. The Foster board should not allow this to happen.
This problem has caused me to make several 500 mile round trips to try to understand and solve the problem. I don't feel that I have succeeded yet unless the USB/Serial adapter was the source of the problem. The only way to be certain is to operate the system over a long period of time and hope it doesn't happen again...
On the last trip, late June 2012, we strengthened the beams that the drive mechanism was attached to that were swaying when the roof began opening or closing. That was sometimes causing the roof to fail to open. The roof opening/closing system is sensitive to changes in momentum.
I also adjusted the roof "travel" so that it no longer bumps into the open end and the closed end of the building.
Status as of 2 July 2012 is that everything was working on 1 July. This morning I tried to open the roof. It started to open then closed. Now, via a microphone I have there, I can hear the roof motor run for the entire open cycle and for the entire close cycle but the roof is not moving. My guess is that the bolts connecting the roof to the roof opener have failed so that the roof is no longer attached to the motor drive system?
My guess was wrong. Gene says that a nylon gear inside the garage door opener assembly broke. A replacement is on its way and will be installed soon. The roof travel that had not been adjusted previously might have weakened this gear when the roof closed and opened with semi-violent collisions at the open end and the closed end. The current roof travel adjustment should prevent this from happening again if that was the problem.
- Recovering from telescope alignment problem (like when it doesn't know where its pointing after the roof closes on it and bumps it out of RA alignment.) Here is the procedure I use:
- Turn the observatory light on remotely.
- Use a video camera that is looking at the telescope to determine where it is pointing.
- Use HandyAvi to manually move the telescope so it is pointing UP while ensuring that tracking stays on. (Cannot reliably use ACP when it doesn't know where the scope is pointing. It will not allow motion beyond certain "stops" that it enforces.)
- Take a 30 second image of the sky.
- Upload that image to http://nova.astrometry.net
- Astrometry.net does a full-sky plate solve of the image and gives me the Right Ascension and Declination of the center of the photo in degrees.
- Divide the Right Ascension by 15 to get the RA hour.
- Calculate the RA and Dec from the values, i.e., convert the fractions from decimals to Minutes and Seconds.
- Enter the coordinates into ACP and resync the scope.
- ACP and the telescope now know where the telescope is pointing.
- High Summer Temperatures.
- Camera Bug.
This was really weird... When summer came I found I could not cool the camera as much as before.
I also began getting light and dark bands in my images which made guiding and imaging impossible: - Bug Invasion.
I noticed there were crickets on the floor of my observatory. I concluded that I would need to seal the walls where they met the floor. Amazing what small a space will admit a cricket. Used caulking to seal everything. Then I saw that ants were still getting through. They were coming through a really tiny hole where the caulking had not closed completely. Resealed that.
Also using bug spray around all the walls.
Still have some insects getting in but fewer I think...
- Garage Door Gear Broke.
Before leaving after fixing the bug invasion problem, I noticed that the garage door opener was banging hard into the front and back walls. Many nails had been loosened. I had assumed the installers had adjusted the "travel" properly but concluded that they did not get it right and that it should not be banging into the front and back walls. I figured out how to adjust the "travel" and got it so it would stop very smoothly just before hitting the walls. I then went home after the above trip.
After returning home I opened and closed the roof remotely a few times from home and then suddenly the roof would not open. People at the site checked and said a garage door opener gear had broken and needed to be replaced.
I'm guessing it was damaged from all the times the roof banged into the front and back walls?
So another trip is now planned so I can replace the gear. Gene was going to have someone do it but they have not gotten around to it and its been 6 weeks with no action so I will have to do it myself apparently.
I am also going to wire the Foster Board AUX 1 relay in series with the roof relay so that I can make sure that the Foster board cannot close the roof in case it is the culprit in the case of the Roll-Off-Roof relay closing without being commanded to close. I can turn off the AUX 1 relay and that will make sure that the ROR relay will not be able to close the roof in case it is randomly closing...
I've also had another Garage Door Opener control board sent to the site and I will replace the control board just in case it is the problem of the roof closing when it is not supposed to. The control board can receive signals from a hand controller apparently. I am going to short the antenna on the control board or at least bypass it with a capacitor to prevent random Radio Frequency signals from triggering door open/close command.
I'm also going to install shielded audio cable from the control board to the door push-button to protect against suspected Radio Frequency radar signals that might be being used by the Border patrol. When the computer speakers are on, I sometimes hear buzzing signals like I used to hear on the radio when I drove by an airport. The buzzing was caused by the airport radar systems. The roof problem has been my greatest problem and I need to solve it this trip if possible...
A friend with the same Garage Door equipment also experienced an unexpected roof opening so it seems like the problem is either the control board or some external RF interference. Hard to be certain though...
- Things are now working properly - so far - since our visit of 20-24 Aug 2012.
Gene's team replaced the garage door opener gear a day or two before I arrived so that helped a lot.
The garage door control board that I ordered was supposedly an exact replacement. I was VERY careful to identify the brand, model, part number, etc... New board was not pin-compatible. So I am still using the old control board.
I have wired the Foster Board AUX 1 relay in series with the roof relay so that I can make sure that the Foster board cannot close the roof in case it is the culprit in the case of the Roll-Off-Roof relay closing without being commanded to close. I can turn off the AUX 1 relay and that will make sure that the ROR relay will not be able to close the roof in case it is randomly closing...
When AstroMC starts up, the AUX 1 relay always comes up in the unclosed position so I have to turn it on to allow the ROR relay to do its job. (I think if the roof is open and the AstroMC software is started up, the ROR relay fires causing the roof to close! I think it does this even if it is unsafe to do so but I need to test that with a spare board I have. In any case, everything is now under positive since nothing can happen unless I have turned AUX 1 on.)
I again adjusted the roof travel so that it now stops smoothly and quietly just before touching the walls at either end of its travel.
I installed additional magnets at the "roof open" and "roof closed" positions to insure that "roof open" and "roof closed" are always reported correctly. The roof open and close positions can vary by a couple of inches... This allows the magnetic switchs to be sure to receive a signal...
I did install shielded audio cable from the control board to the door push-button to protect against suspected Radio Frequency radar signals that might be being used by the Border patrol. I discovered that the previous wiring (Cat 5 cable) had the whole roof resting on it in one place. I could not pull the old cable loose from where the roof was resting on it. Could have been intermittently shorting there? Seems unlikely but maybe remotely possible. That would have caused the roof to open/close if those wires occasionally shorted to each other.
I unsoldered and removed the antenna from the garage door opener control board to reduce the possibility of random radio signals causing the roof to open and close.
So far, everything has been working properly since the last changes. I have been able to automate the imaging process completely using the ACP software. Here is an example of a script I used to image NGC300 (semicolons denote comments, # signs denote commands):
; PLAN FOR OBJECT: NGC300 Transit: 2338 Local == 0638 UTC
; Start imaging at 2100 Local == 0400 UTC;Waituntil is UTC, i.e., local + 7
;06PM == 0100 UTC, 07PM == 0200 UTC, 08PM == 0300 UTC,
;09PM == 0400 UTC, 10PM == 0500 UTC, 11PM == 0600 UTC,
;12PM == 0700 UTC, 01AM == 0800 UTC, 02AM == 0900 UTC,
;03AM == 1000 UTC, 04AM == 1100 UTC, 05AM == 1200 UTC
;
;#count 5,5,5,5
;#interval 300, 600, 300, 300 - would take over 2.5 hours
;#interval 600, 600, 600, 600 - would take over 3.5 hours
;#interval 600, 1200, 600, 600 - would take over 4.5 hours;WAIT UNTIL 6PM local time
#waituntil 1, 01:00:00;TAKE BIASES AND DARKS ~1.5 hours
#repeat 1
#count 5,5
#filter Luminance, Luminance
#interval 0,0 ;~10 Minutes download time
#binning 4,2
#BIAS
;
#repeat 1
#count 3,3
#filter Luminance, Luminance
#interval 600, 1200 ;~1.3 hours
#binning 4,2
#DARK;SET DOME OPEN TIME (UTC) (Should be after 0230 UTC)
#waituntil 1, 03:30:00;OPEN DOME AND WAIT FOR SCOPE TO COOL DOWN
#domeopen;SET TIME TO START IMAGING
#waituntil 1, 04:00:00;START IMAGING
#repeat 1
#count 5,5,5,5
#filter Red, Luminance, Green, Blue
#interval 600, 1200, 600, 600
#binning 4,2,4,4
NGC300 00 54 36 -37 42 14;TAKE SKY FLATS AT DAWN
#dawnflats;SHUTDOWN OBSERVATORY
#shutdown
;
; -----------
; END OF PLAN
; -----------
;
I am a "morning person" so I can set up a script like this in the afternoon and have it run and do everything that needs to be done automatically... And I can sleep during the run... :-)
Then in the morning I can do image processing... I do all of the initial processing on the remote machine. That includes:
- Setting the Maxim DL calibration using the dark, bias, and flat frames.
- Running the FixBadPixels.vbs file I wrote that automatically uses Maxim DL to:
- apply the new calibration data to each of the target image frames
- automatically eliminate all of the hot pixels and dead pixels via Maxim DL's hot pixel and dead pixel kernel filters
- place each cleaned-up image in a new sub-directory
- Using Maxim DL to stack the cleaned-up images and produce the master L, R, G, and B images.
- Transferring the L, R, G, and B images to my local machine.
Then I do further image processing locally using those 4 images. (Uploading all of the raw files including raw images, the flats, the darks, and the biases to my local machine would be totally prohibitive due to the time it takes to upload a file!)Everything has been working well since this last visit... The roof has not crashed into my telescope since I made these last changes...
- Started trying to use FocusMax in December 2012. Strange system that apparently does a great job of focusing your telescope. Was not immediately clear to me what it was trying to do but now I think it does this:
- When you use it for the first time, make sure you have a star centered on your imaging chip that is somewhere around 6th magnitude then run the "First-light wizard". It does a bunch of non-obvious stuff that results in a "V-curve" that the system will use from then on in its operations. The curve provides a clue regarding how big the star gets as you go toward and away from focus.
- When focus operations are underway it does not use a focused star image! It uses a DEFOCUSED star image and calculates where the REAL focus position should be using the V-curve if I understand it correctly. It then sees if the calculated position repeats itself often enough to conclude that it really knows where the focus position is. This eliminates or nearly eliminates the effects of bad seeing conditions.
- Then it goes to the focus position and takes another image and checks to see if it is happy with the star image that is at the calculated focus position.
- If it is happy then quits focusing operations. If it is not happy, it tries again...
- I initially used the wrong ASCOM telescope choice in FocusMax working in conjunction with ACP. FocusMax's Acquire Star algorithm then did not coordinate its telescope movement operations with ACP causing ACP to essentially lose my telescope's sync with the night sky! So it did not park in a "safe" position. So I could not close my roof in the Foster subsystem, AstroMC. My normal park position is due south. When I unparked the scope, the ACP reported Elevation was less than 0. When that happens, ACP refuses to allow you to move the scope! So I was stuck with an unsynced scope 250 miles away and a roof I could not close. Tried LOTS of things. I knew I had to fake it out somehow. Finally realized that the Park position is held in Azimuth/Elevation coordinates maintained in the ACP registry at HKLM\SOFTWARE\ASCOM\Telescope Drivers\MeadeEx.Telescope and under the items ParkAlt and ParkAz. My ParkAz is 183.000. My ParkAlt was .6 which somehow caused the unparked altitude to be less than 0. So I parked the scope in ACP, modified ParkAz to be bigger and unparked the scope. The value I used was 1 which was enough to allow the unparked value to be greater than zero which then allowed me to move the scope so that I could get it into a "safe" position so that I could close the roof. Could not "park" it though because sync had been lost. I turned of "tracking" so that the scope wouldn't move and grind into the roof... Then the next night, I opened the roof and pointed the scope "up" at the night sky using my cameras and a light to see where the scope was pointing, took a 30 second 4x4 binned image, submitted it to http://nova.astrometry.net, let it plate-solve and tell me the coordinates of the center of the image, then used ACP to enter the coordinates and "Sync" the scope. Then everything was once again synced and usable... Pretty messy process... But you can recover if you are determined...
- Observatory power was being lost for weeks at a time.
- Seemed to coincide with rain storms.
- Gene and another astronomer, while it was raining, discovered a place in the ground that was smoking and seemed to be related to the circuit breaker throwing.
- Found uninsulated wire in the ground that, when wet, was shorting and causing circuit breaker to throw.
- Applied insulation to the wire and there has been no problem since...
- Roof problems began again with truly random behavior. Gene and I spent two very intensive days troubleshooting.
- Fixed all places where roll-off-roof was rubbing against the building.
- Fixed all mechanical problems where motor was not stabilized properly and was moving a few inches forward/back when it ran.
- Added additional bolts to stabilize rail mounts that were moving up and down.
- Added additional bolt where the rail connected to the building to make sure the rail could not move up/down.
- Fixed everything we could think of.
- Still had random behavior.
- Finally replaced motor and puzzled through getting it to operate the chain drive properly.
- Everything has been working perfectly since! (Except for Foster board problems due to their software.)
- Everything is now usable!
- Foster board software problems.
- This has been a constant problem. The software consists of AstroMC that does my roof control, the firmware for the board andthe firmware for the AstroAlert weather monitor. The software is not very well version controlled, i.e., old versions disappear from the site and new versions often have the same release number but different dates with different behavior. The latest versions have diverged so much from earlier versions that I have been compelled to stay with an earlier version.
I have an extra Foster board that I used at home for testing various versions of the software. By wiring up switches to simulate roof open, roof closed, telescope safe, telescope unsafe, and listening for the relay closures I am able to determine some of the often strange behavior of the software. I cannot guarantee that you will get these results but these are the results I got:
- AstroMC 1.9.9f Seems to be ok. 50 second com delay on startup...
- Firmware H8 5-13-12 from H version directory OK
- AstroAlert 1.4.3 from F version directory
- Firmware H8 4-09-11 from F version directory crashes scope...
- AstroMC 1.9.9h Cannot read weather...
- AstroMC 1.9.9g Does not work roof control
- I just finished analyzing the behavior of various versions of Foster AstroMC and AstroAlert software using a spare board I have here a the house for testing. I again had a problem where the roof unexpectedly banged into my telescope in New Mexico. I believe that happened when either the USB/Serial port re-established itself or I might have stopped and restarted AstroMC.
- I had not realized that simply starting AstroMC with one of the versions of the H8 firmware (distinguishable only by the "modified date") could cause this sort of problem!
- I rigorously tested each of the following...
- If you use:
- AstroMC 1.9.9f
Firmware H8 4-09-11
AstroAlert 1.4.3 from F version directory - and your roof is OPEN
- and your telescope is UNSAFE,
- and then you start a new instance of AstroMC,
- there is about a 50 second delay then the serial port is connected and
- the RoR relay is pulsed!
- the roof closes and crashes into your telescope...
- AstroMC 1.9.9f
- If you use:
- AstroMC 1.9.9f
Firmware H8 4-09-11
AstroAlert 1.4.3 from F version directory - and your roof is OPEN
and your telescope is SAFE, - and then you start a new instance of AstroMC,
there is about a 50 second delay then the
serial port is connected and the RoR relay
is NOT pulsed. Roof remains open.
- AstroMC 1.9.9f
- If you use:
- AstroMC 1.9.9f
Firmware H8 5-13-12
AstroAlert 1.4.3 from F version directory - and your roof is OPEN
and your telescope is UNSAFE, - and then you start a new instance of AstroMC,
there is about a 50 second delay then the
serial port is connected and the RoR relay
is NOT pulsed. The roof does not crash into your telescope...
- AstroMC 1.9.9f
- If you use:
- AstroMC 1.9.9f
Firmware H8 5-13-12
AstroAlert 1.4.3 from F version directory - and your roof is OPEN
and your telescope is SAFE, - and then you start a new instance of AstroMC, there is about a 50 second delay then the serial port is connected and the RoR relay is pulsed. This causes the roof to close.
When it completes closing, the RoR relay is again pulsed! This opens the roof... When the roof is opened this time, there is no additional RoR pulse so the roof stays open...
- AstroMC 1.9.9f
- AstroMC 1.9.9g and AstroMC 1.9.9h do not properly work with the AstroAlert weather monitor.
- I tried both AstroAlert 1.4.3 and AstroAlert 1.4.4 and neither would work with with AstroMC versions greater than 1.9.9f.
- AstroAlert 1.4.4 didn't work with anything in DirectConnect mode...
- So to recap:
- I am now going to use
- AstroMC 1.9.9f from the AstroMC Roof Update F version download
Firmware H8 5-13-12 from AstroMC Roof Update H version download
AstroAlert 1.4.3 from the AstroAlert Update 1.4.3 zip file download
and hope that the roof will no longer crash into my telescope. (Thank god for the good Meade clutches on the LX-200 Classic scope...)
- Even running with the Foster software and firmware I selected above, I still occasionally run into really strange behavior. For example:
- My telescope somehow lost alignment with the night sky so that the ACP "Park" position was pretty close but the magnetic switches were not closing.
- I determined from the cameras in my observatory that I could safely close the roof. The telescope was parked close enough to what it should have been.
- However it was not lighting the "safe" light in the Foster AstroMC program.
- I tried to achieve the proper park position but was unable to find it.
- I needed to close the roof though since the sun was coming up.
- So I decided to use AstroMC's Setup panel and selected "Unsafe Bypass" which supposedly tells the system that it is OK to close the roof even though the telescope is not registering "safe".
- Don't recall every detail but I had to try lots of stuff to get the roof closed.
- Then during the next day at dusk, I needed to open the roof so I could point the scope "up", take an image of the sky when it got dark, submit the image to Nova.astrometry.net to analyze the image and give me the coordinates of its center so I could "sync" the scope in ACP.
- Got the roof open.
- But the sunlight was on the scope heating stuff up so I decided to close the roof and wait a bit longer.
- NOTHING I TRIED allowed the roof to be closed. It would close 1/3 closed but no further. Even "manual opn/cls" would open the roof fully then close it only 1/3 of the way.
- Rebooting the computer did not help.
- Powering the Foster board down then up did not help.
- Nothing was able to get the roof closed!
- Good thing it was not raining!
- Got the roof fully open and left it that way.
- It got dark. I took an image. Nova.astrometry.net plate-solved the image. I synced the scope, parked it and now it registered safe.
- With the scope again registering "safe", the roof opened and closed normally as if nothing had been wrong...
- Very weird and annoying behavior which cost me LOTS of time.
- 3 Jun 2013 - Roof would not open!
- Finally, good weather and near new moon. Roof would not open.
- Tried everything I could think of.
- Finally decided to drive to Rancho Hidalgo and debug there...
- While at home, tested my spare Foster board. It was working perfectly so if necessary, I could swap the boards
- Arrived at Rancho Hidalgo. My spare board did not work on my Rancho Hidalgo computer!
- Then I discovered that it did not work on my laptop either!
- Finally reinstalled Foster software and reloaded the firmware on the spare board. It worked!
- reinstalled Foster software and reloaded the firmware on the board I've been using at rancho Hidalgo. It worked too!
- I do not understand how that could occur.
- However Foster software is pretty weird. They always download a character string telling of their latest version - which I don't want to use. Wonder if they overran their buffer and messed things up?
- Anyway, roof opens and closes properly now.
- 4 Jun 2013 - Same trip -
Problem with my remote CGE "last align" mode
solution.
- Software I wrote to operate Canakit hardware to push button on CGE hand-paddle to get scope into "last align" mode began having Serial Read Errors!
- Finally reinstalled driver for the Canakit device and the Serial Read Errors ceased... Had to reinstall it twice though! I don't understand... Should never have to reinstall drivers for anything...
- 4 Jun 2013 - Same trip - Tracking problem with LX-200!
- 20 second exposures showed star trails!
- The scope was somehow not tracking the sky.
- I was tired. Replaced Dec motor then realized I should have been doing the RA motor!
- Replaced Dec motor with original Dec motor because it was fine...
- Probably did Dec motor because it was easiest to get to. RA motor requires the telescope to be removed from the superwedge so the base plate can be removed in order to access the RA motor.
- Too tired. It was dark. Decided to do it in the morning
- 5 Jun 2013 morning - Same trip - Continuing to solve tracking problem.
- Decided to move hook that I use with pulley to lift the LX-200 to other side of peak of roof cross beams. Much better angle for lifting the scope off of the wedge. Wish I had thought of that originally...
- 4 hour job.
- Stepped off ladder thinking it was only one step to the floor but it was two. I fell. Head broke through the wall plaster board. Left 8 inch hole in the wall. Fortunately nothing broken, no concusion. If I had hit a beam, I would be in really bad shape. Just luck... I was getting tired anyway and frustrated. Decided I'd better stop and eat lunch.
- Gene helped me get the hook mounted because I was having trouble drilling through the 2x6 and hitting the screw-holes in the metal plates on both sides. Gene got it. Much better with a drill than I was...
- Rigged up pulley. Lifted scope, removed bottom plate with scope suspended above me, replaced RA motor while dropping screws and having to hunt for them. Pretty tedious.
- Finally reassembled everything. Gene helped me guide the scope back onto the mount.
- 5 Jun 2013 evening - Same trip - Continuing to solve tracking problem.
- Started testing with new RA motor.
- Got star trails again!
- Wondered if telescope mother board was failing.
- Finally decided to erase PEC training.
- Used hand-paddle to try to access PEC erase via "SMART" mode. Scope said BEEP BEEP BEEP! I could not get into SMART mode! Again suspected mother board.
- Accessed a pdf copy of the Meade manual.
- In an obscure paragraph it mentioned that the PEC mode could only be entered if the scope was in Polar mode. (Nothing about BEEP BEEP BEEP though! How the hell was I supposed to know what the BEEPs meant...)
- Of course it must be in Polar mode. I had that set up in ACP and had never changed it.
- HOWEVER, ACP somehow had forced it into Alt/AZ mode! Even though I had unparked it in ACP!
- Fiddled around with hand-paddle, etc.
- Finally got ACP to agree to leave it in Polar mode.
- Now the scope could track!
- No more star trails!
- Everything back in working order!
- At least now I have an additional reason to use my remote hand-paddle control system because it was necessary to press buttons on the hand-paddle to recover from this problem.
- 29 Aug - 6 Sep 2013 - Trip to Rancho Hidalgo
- Couple of weeks ago, Foster board was saying the roof was open AND closed simultaneously. Either a board problem or bad magnetic switch!
- After arrival at the observatory, I disconnected the roof-open wire and the board still said roof open! Definitely bad microprocessor. Presumably nearby lightning strike put a lot of voltage on the magnetic sensor line. I then noticed that the line goes DIRECTLY to the microprocessor input! No ESD protection!
- Removed microprocessor and installed a socket for a new microprocessor.
- Programmed the microprocessor using a PICkit 2 Development Programmer/Debugger system from Microchip.
- Board restored to working condition.
- AMC-101 weather monitor was also not working. Removed PIC processor, installed socket and new microprocessor. Was unable to load software so was unable to restore the board to working order.
- Ordered a new weather monitor system upgrade from Foster.
- Brought new 64-bit computer with 64-bit operating system to allow more than 4-Gig of memory to support VMWARE virtual machine for operating second telescope. Tried everything but ran into insurmountable problems when trying to handle "removable devices", i.e., serial ports and SBIG camera. This was not a problem on the old machine which was 64-bit but running a 32-bit operating system. Reinstalled the old machine but with a memory upgrade bringing it up from 3 Gigabytes to 4 Gigabytes.
- Had one occasion on the Virtual Machine where it said "Hardware or driver error - Source ASCOM utilities - Timed out waiting for received data...." No info on what timed out, which software was responsible, what the time-out value was, etc. Internet was no help. However was able to successfully run both telescopes from one machine which was what I was trying to do. One scope successfully imaged NGC6888 while the other imaged NGC7392. Both ran at the same time and successfully completed the imaging session.
- Had been noticing some blooming of bright stars using the SBIG STL-11000M camera. Somewhat irritating because it is supposed to be an anti-blooming camera. Then I discovered an SBIT app note: Adjusting the ABG Level on the STL-11000M Camera (sic.) I did the adjustment. Not only did the bloom go away, the dimmer stars were MUCH MORE WELL-DEFINED! This was a surprise! Here are some comparison images that were focused with FocusMax so focus is correct in both:
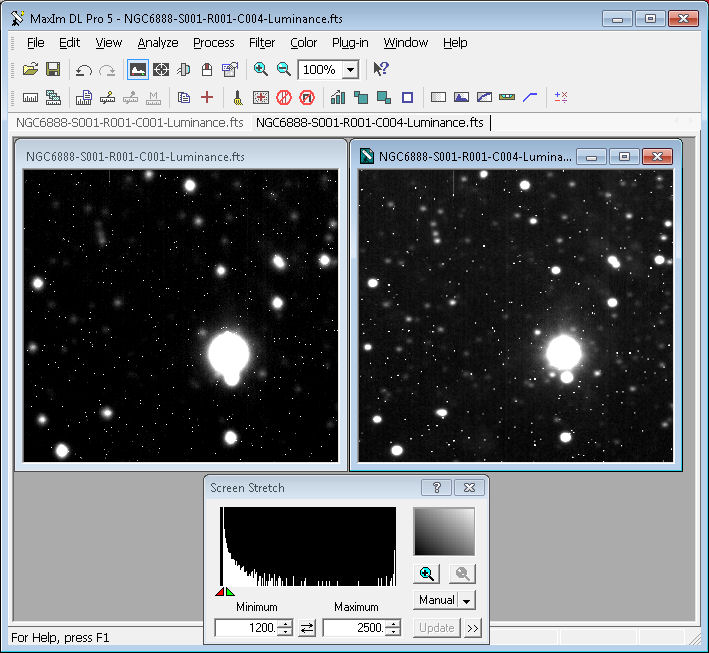
Image on left is with original SBIG setting. Image on right is after their recommended adjustment. Both images were taken at about the same time of night. Image on the right was taken one night after the image on the left and after the adjustment. Both images have been screen stretched identically as shown. Note the large size of the brightest star in the image on the left. Note the better definition of the smaller stars in the image on the right! This improvement surprised me! (Note that the smallest dots are "hot pixels", not stars. This is the raw data before application of calibration so you can see what the camera is really doing...)
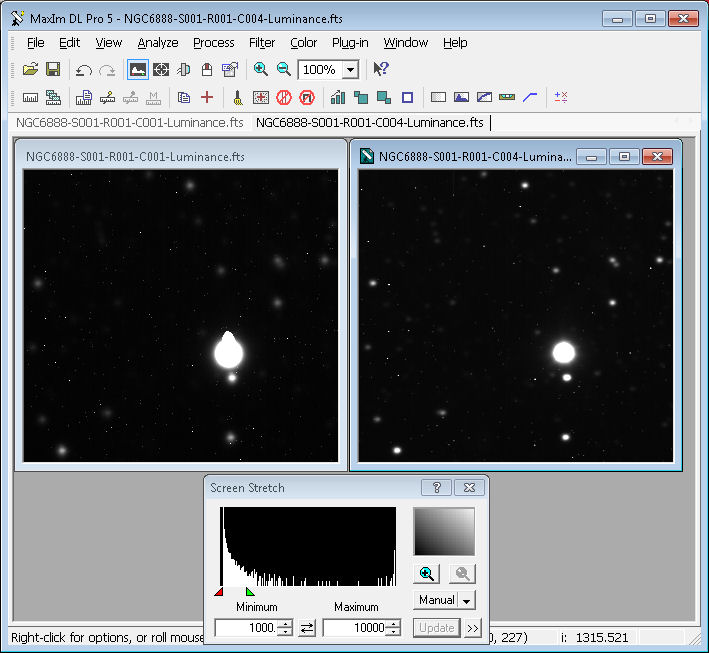
Same images as above but with the Screen Stretch asjusted to better show the blooming of the bright star. (My camera is mounted "upside down" so the bloom streak is UP instead of DOWN in my images compared to what is said in the SBIG adjustment document.)
So, astoundingly, my images in the future should show much better definition!
I did not expect the blooming adjustment to improve the resolution of the smaller stars!
- 22 Nov - 30 Dec 2013
- Installed new AstroAlert V3 weather monitor from Foster Systems.
- Works well with the exception that it show 0 C for all temperatures below zero and it shows the wrong sky temperature for Fahrenheit.
- Discovered an unexpected failure mode of the Garage Door opener
-
Chamberlain Garage Door/Roof Opener – Peculiarities
“Safety reversing sensors”
When my Roof is OPEN, it corresponds to garage door DOWN.
When my Roof is CLOSED, it corresponds to garage door UP.From the Chamberlain LiftMaster Document:
“The garage door opener will not close from a remote if the indicator light in either sensor is off (alerting you to the fact that the sensor is misaligned or obstructed).”
It apparently will not close when the wall mounted button is pressed either, i.e., if the sensors are obstructed, and the roof is OPEN, it cannot be closed by pressing the button on the wall mounted switch! It makes an attempt but immediately reverses direction! This is to protect against a kid getting crushed if he is in the sensor pathway near the garage floor and you are trying to close the garage door… If you HOLD the wall mounted button down however it will go all the way in either direction even if the sensors are obstructed.
This happened to me when the sensor windows became fogged up from internal water vapor condensing on them. It acted like the sensor path was obstructed. You could close the roof if it was open but you could not open the roof when it was closed…
Obstructed sensors also mean that you cannot use the hand controller. When my sensors were fogged up internally, attempts to use the hand controller caused something in the motor box to click 10 times at a rate of about one click per second. This is not in the manual. I had to call Chamberlain (1-800-528-5880) to find out what the clicking noise signified…
I replaced the fogged-up sensors with another set of sensors that were not fogged up.
My roof is now behaving normally…
Had help from Danny Bersch to analyze the transmitter and receiver. There are two boards that comprise the “Safety Reversing Sensor” system. The white wires of both are connected together. The black wires of both are connected are connected together. There are no other wires. These wires plug into two ports of the garage door controller board. These wires provide power to the two boards.
The capacitors on the board are rated for 10 Volts so the power supplied to the boards is probably 5 Volts although it could be less. The comparator can operate down to 2 Volts.So I could not see how the boards signaled that the path between the IR diode on the Transmitter board and the IR receiver on the Receiver board was obstructed.
I noticed that one board contained, on the back side, a surface mounted LM2903, which contains two comparators. Here is the data sheet for the LM2903: https://www.ti.com/product/LM2903Dan said a comparator could be used as an oscillator. Here is a Comparator Oscillator circuit from the internet:
So Dan suggested that one of the comparators is probably being used as an oscillator and that is being used to turn the IR Diode on and off so that it pulses, i.e., blinks.
First you have to make sure that the transmitter board does not leak the oscillator signal to the wires supplying power to the two boards. You do not want any signal from the transmitter board to get onto the wires supplying power to the boards.Then the receiver board’s IR receiver simply receives the pulses from the IR diode and makes sure that the pulses seen are transferred to the wires supplying power to the boards. The motor controller board in the Chamberlain then looks for the signal and operates the door correctly if the signal is seen…
This is a video showing door behavior and an oscilloscope trace of the signals when the sensors are aligned and when they are unaligned:
http://www.youtube.com/watch?v=GbmufXgpl14 - Discovered that my solenoids that push the buttons on the Celestron Hand Control that I use to get the CGE mount back into "last align mode" were not strong enough. It is colder now that it is winter and the buttons are made of some sort of rubber-like material that is now stiffer due to the cold!
- Ordered some newer solenoids but they also are not strong enough.
- The solenoids are 12 Volt solenoids.
- The suggestion was made to me during a dinner attended by many of the Rancho Hidalgo and Granite Gap astronomers that I might be able to use 24 Volts to power the 12 Volt solenoids since they are only on momentarily and probably would survive the higher voltage.
- I did not have a 24 volt power supply to test with and I was down to the last day of our trip there so I will test this at home and see if it will be a solution - Or try to buy some 24 volt solenoids...
- I will install new solenoids and 24 Volt power supply on next trip... There will be no problem between now and then as long as the CGE mount stays powered up.
- 5-10 Feb 2014
- Meade Scope stopped working on 7 Jan 14.
- Gene put scope into park position so I could close the roof.
- Gene also tried to power scope up but it wouldn't.
- Gene tried one of his power supplies but it still wouldn't come up.
- I assumed that fuse had blown on the power board.
- I was guessing that one of the 6.8 MFd 25 Volt Tantalum capacitors on one of the 5 Meade boards had blown and taken the fuse with it.
- Got a bunch of 6.8 MFd 35 Volt Tantalum capacitors and replaced the ones on the Meade boards but none of the originals had blown.
- Final conclusion: The 2 Amp Slow-Blow fuse finally blew after many years of operation... :-)
- Also encountered new roof problems where roof was rubbing due to boards settling. Additional roof bracing was done by Gene's crew.
- Also had a roof hang-up caused by roof rail guide hitting a small bump on one of the rail supports. Filed it down. Runs OK now.
- Then turned attention to the Takahashi scope on a CGEM mount.
- Replaced the solenoids on the board I created to push the Enter and Down buttons of the Hand Controller remotely. Increased the solenoid voltage to 24 Volts instead of the 12 Volts the solenoids were rated for so they would push with more power. (Buttons pushed easily in the summer when it was 100 Degrees but they were much stiffer at 0 degrees in the winter!)
- Solenoids worked fine then so the software I wrote could automatically push the buttons remotely and allow me to get scope into "last align" mode.
- Then I met Al Acker there at the Ranch who told me I could use Celestron's NexRemote software to do eliminate all Hand Controller operations!
- Didn't believe it at first but he showed me what needed to be done!
- This is essentially undocumented or at least extremely poorly documented by Celestron! Nothing in their help files or web pages would have given me any clue that this was possible!
- Here is how it works:
NexRemote and ACP
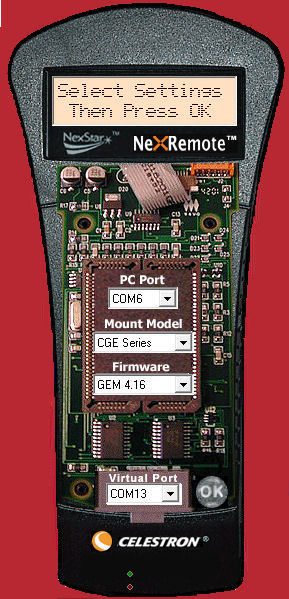
ASCOM uses “Virtual Port”! I set it to Com13 since that was not being used currently by any "real" COM ports.
Then hit OK.
If this is the first time you are setting this up, do alignment steps using NexRemote so that NexRemote will have proper alignment. (This is totally independent of any alignment done using the hand controller! NexRemote knows NOTHING about any alignments done using the hand controller!)
After “Align Success” it says “CGE Ready.”
This alignment will be remembered by the NexRemote software. When we bring up NexRemote in the future, we need to push appropriate NexRemote buttons to set it to "Last Align" mode before connecting to ACP.
Now we can use ACP Telescope -> Setup
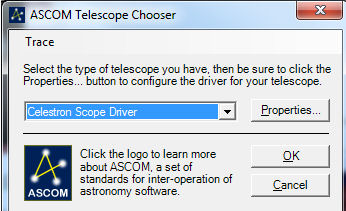
Choose Celestron Scope Driver
Then select Properties:

Set the Serial Port to the Virtual Port (COM13 in the above example.) Set other parameters as needed of course...
Click OK and OK.
Then set up telescope in ACP and “Connect” in ACP.
Everything should work!Works for me! (Obviates the need for the solenoid system...)
THANKS to AL ACKER who might have been the only person in the world who knew how to do this?
- 20-23 Feb 2014 - Meade RA Motor Problem
Arrived at Rancho Hidalgo at about Sundown on Thursday, 20 Feb 2014. came down because Meade LX-200 would not power up. Failed a week or so ago. Gene put it back in Park position so I could operate the roof and use the Takahashi TOA-130 scope prior to coming down to Rancho Hidalgo to fix the LX-200.
- Magnetic Switch failure
The roof-open magnetic switch appears to be failing intermittently.
The roof magnetic switch says roof not open when it is open. I have a work-around to keep the scope from getting bumped
when the Foster software appears to do something incredibly stupid, i.e., if the magnetic switch says "open" then somehow switches to "not open" then it appears that a new pulse is sent to the garage door opener to try to open it. Of course that causes it to close and bump the scope. Not positive but that is the only thing that explains what I observed. I have seen the magnetic switch go from "roof open" to "roof not open" all by itself when the roof has not moved...
The roof did bump my Takahashi scope while it was up apparently due to this hardware/software problem and I realigned it when I was down at Rancho Hidalgo in Jun 2014. Then I made sure it would not happen again by applying a work-around.
The work-around is that I put one of the auxilliary relays in series with the open/close signal line so that I can "Allow Roof" signals or not. If I disallow roof signals to be passed on to the garage door opener, then any undesirable Foster software activity is thwarted. I.e., the roof cannot receive open/close signals and my scope cannot be bumped... I have been opening the roof manually recently and then setting "Allow Roof" so that roof movement is disallowed during my imaging session.
If I had access to the Foster software source code I could of course correct such issues but it has not been made available.
I also connected the second Auxilliary relay so that it closes the open/close signal line IF "Allow Roof" is closed. This allows me to directly open or close the roof as an override if I am sure that the telescopes are in a "safe" position. This was more reliable than what the Foster software provided although it "dangerous" if the telescopes are not in the "safe" position where the roof cannot hit them.
- Found more powerful magnetic switches on the internet and added them to the roof-open and roof-closed positions. Have had no problems since with false roof-open/roof-closed indications.
- 2014 was an extremely unusual year for lightning
- Lightning Struck Observatory Blues
When I woke up this morning
The comm gear was all working well
When I woke up this morning
The comm gear was all working well
When I woke up this morning
The comm gear was all working well
Then a lightning stroke later
all the comm gear went straight to hell
Chorus: I got the bad luck, comm stuck,
lightning struck observatory blues
I got the bad luck, comm stuck,
lightning struck observatory blues
I got the bad luck, comm stuck,
lightning struck observatory blues
My scope is unresponsive and
I need more telecom clues
Valley Telecom boys, they
replaced all their gear
Valley Telecom boys, they
replaced all their gear
Valley Telecom boys, they
replaced all their gear
Then lightning struck again and
we gave up and all had a beer
Chorus
Network switch cost seventy dollars a pop
Network switch cost seventy dollars a pop
Network switch cost seventy dollars a pop
When lightning strikes again that switch
gonna come to a stop
Chorus:
- Lost half of the main router
- Lost a netgear network switch
- Lost my personal router that is in my observatory.
- MY GUESS AS TO WHAT HAPPENED
- Lightning strikes to ground in vicinity of
our observatories induced currents in ethernet
cables buried a few inches underground. - Those induced currents blew some of the
devices. - There were no direct lightning strikes on any
of our equipment or things would have been
MUCH WORSE.
- Lightning strikes to ground in vicinity of
- Made plans to apply simple fixes for this sort of problem
- No plans to handle direct strikes of course. I think direct
strikes are unlikely... Could be wrong of course but not sure
lightning rods would be effective. They would also increase
the probablility of local current-inducing strikes?
- Lightning Struck Observatory Blues
- July 5-11 trip to Rancho Hidalgo...
- Drove a ground rod outside of the Celestron building
and connected it to power system ground to protect the
new network switch I bought. - Installed APC Protectnet devices:
- at my router (to the main network switch
in the Celestron building.) - at the main network switch to my router.
- at the main network switch to the main
router in the brick building. - at the main router to the network switch
- at the main router to wherever the ethernet
signal comes from (Valley Telecom's stuff.)
- at Bernard's switch to the main network switch.
Bernard dropped one off that he bought before
we left. I bought the rest. My goal was to try
to protect the route all the way to my router...
- at my router (to the main network switch
- Replaced my router. The old one had blown out because
of the lightning strike. There were no lightning direct hits.
I believe the lightning was a ground strike and electron
flow across the ground induced current on the buried
ethernet cables. The longest run is from the main switch
to my router. I think that is why the main switch and
my router blew out. Maybe why two ports on the main router
also blew out.
- Installed two new outside cameras. You can look
if you wish...- North view: 206.128.69.5:4006 UID is guest. Password is Rancho
- South view: 206.128.69.5:4007 UID is guest. Password is Rancho
- Got Bernard's systems running by unplugging and replugging his network switch.
- Checked out Eric's systems. His computers are running but
he did not have contact with them. Don't know why...
- Worked with Brian Ottum. Walked me through his
equipment and we discovered that the TeamViewer
data showing on the screen at RH had somehow changed.
Read him the new data and he was back in business. - Worked with Gene to see why there was no communcation
with the Granite Gap router. Worked with Valley telecom
who finally found that their comm gear had two blown ports
out of the 4 ports on their machine. Gene switched ports
and Valley Telecom activated that port and the router
then was accessible remotely. - We set the replacement "radio" up temporarily in the box at the base
of the tower. Phil was then able to connect remotely
via the aforementioned router to the "radio" and program it. This
"radio" is on the RH side of the Granite Gap microwave
relay system.
- No one has yet climbed the tower to put the radio
where it needs to be. (Volunteers welcome!) (I believe this was
eventually accomplished and Granite Gap communications was
restored.)
- Lost communications with my computer at the observatory.
Gene was kind enough to check it out. Machine was not coming
up properly. it was asking for a CD. No way to get it working.
Tried everything we knew... The machine was running
Windows 7 Ultimate 32-bit Operating System. That meant it
could not use more than 4GB of memory. That had been a
performance problem for VMWare virtual machine operations
which I was using to operate my second telescope.
When I brought the machine home I was able to get it working
by replacing the DVD drive! It was apparently the source of the
problem. Machine is working well here at home now.
- 19-23 October trip to Rancho Hidalgo
- Bought a new computer with 16GB of memory. Set it all up here
at home with Windows 8.1 Enterprise then drove to Rancho Hidalgo
and installed it. - Before the trip I had noticed that my LX-200 scope had unexplainably
moved and I was afraid that the RA motor might have been damaged
by pushing the camera up against the roof. It seemed to be in
tracking mode when it should not have been. - Computer installation went fine.
- Telescope repair took a few days. I had to cannibalize the
tiny motor control board from another motor and install it
on the RA motor. That worked. LX-200 restored to operation.
- Bought a new computer with 16GB of memory. Set it all up here
- Worked to get scopes and cameras running properly again remotely from home...
- Lots of work required to get LX-200 to again track properly.
- Used the software system I wrote (Click here to see my remote hand-control system)
to directly access the LX-200 to redo Periodic Error Correction (PEC) remotely using
MaximDL autoguiding to provide the corrections needed.
Had to do this a couple of times to make sure I had good seeing - Also, the RA motor when it reverses, creates a deviation in DEC. Should
not happen but I discovered years ago that it depends on the the RA motor
placement, i.e., loosen bolts, move it slightly, tighten bolts and see
if it is better. Since I could not be there to do that I finally realized
that in Maxim DL, I could suppress the RA motor signals so that no
corrections would be sent to RA. I was then able to get good Dec
Periodic Corrections. Note that this can only be done if the scope
is aligned extremely well so that the star does not move much in
RA when the RA tracking is suppressed. I used iterative alignment
long ago when I was at the observatory to get nearly perfect alignment
so the star stayed in the box with no RA corrections.
- ST-4000XCM one-shot color camera problem on 64-bit machines
- Bad weather precluded me from using the scopes much until about 26
Nov. - I tried to use the ST-4000XCM camera and discovered that it would
not work properly on a 64-bit system. - Fortunately I have two ST-4000XCM cameras, one here at home
and one at the observatory or this problem might never have been
solved. - The solution involved 5 or 6 people at Cyanogen and SBIG who
had a great deal of difficulty resolving this problem. - Finally, I had one of the principals, Matt, log on remotely using TeamViewer
and work through the problem.
- Problem was that wrong firmware was being uploaded
to the camera when SBIGDriverChecker64 was used to set up
the drivers. - When that happened, the camera did not deliver proper images.
They were strange looking and the pixel values never got
even close the the 65535 values they should have had for a 1 second
exposure when the camera was pointed at a bright light! Maxed out
somewhere around 4000 or below... (That's how you'll know if you
have this problem. Either that or when you take a picture of the sky,
no stars are present in the image you get!)
- My camera is ST-4000XCM WITHOUT the RGH Connector.
If you have the RGH Connector you might not experience this problem. - Here is the workaround that makes my camera work on both 64-bit and
32-bit operating systems:- Use SBIGDriverChecker64 Version 4.00 Build 10
and download and update the drivers.
- Hit the Config Drv button.
- Hit the Select ST Model.
- Choose "My ST is a Pro Model *with* the RGH Connector"
even though my camera is actually a "Classic Model
*without* the RGH connector."
- Update the drivers to ensure that sbigpcam.hex is the 2.46 version
- Then to go to C:\Windows\System32\drivers and rename
sbigucam.hex to sbigucam_x.hex and rename sbigpcam.hex
to sbigucam.hex.
- Power down then power up the camera. (That causes firmware
to upload!)
- The correct information has now been uploaded to the
camera and it works properly!
- Use the Device Manager and double-click on "SBIG
USB Camera with Firmware" which is under "SBIG USB
Devices" to bring up the properties window and look
under "Details", "Hardware Ids", to see that it has the
correct information "USB\VID_0D97&PID_0101&REV_0002"
instead of the incorrect "USB\VID_0D97&PID_0101&REV_0001"
which shows if you don't do this workaround.
- Use SBIGDriverChecker64 Version 4.00 Build 10
- NOTE that SBIG, etc., will probably fix this and you might not
need to use this workaround in the future. - The other peculiar thing is that I appear to be the only guy in the
world trying to use an "ST-4000XCM camera without the
RGH connector" currently? Amazing!... It is a good camera! - It is now restored to operation and I am getting stars in my
images again!
- Bad weather precluded me from using the scopes much until about 26
- Failure of Foster AstroAlert Weather Monitor...
We went to Rancho Hidalgo to fix this: 25 April - 2 May 2015
- Weather monitor started failing in March 2015. Main window
did not show any data. The "Traffic" window showed "CRC Error"
I wish the software would have noted the error but
continued to deliver data even if incorrect. Like with a
yellow banner saying "CRC Error - data may be in error."
I could have still used the wind data. - See http://fostersys.websitetoolbox.com/post?id=7225564&trail=15
for the thread showing the problem and discussion regarding
how to fix it by replacing the SHT-71 temperature/humidity module.
- I am at the telescope site now. Removed silicone sealant
and then unplugged, replugged SHT-71 temperature/humidity
device. Astroalert software then registered data properly with
no CRC error indication. After a couple of hours, I am again
getting CRC errors. It is dark now.
In the morning I will use one of the new SHT-71 devices.
I am guessing that the old one truly is failing but it came
up for a few minutes after it was unplugged then replugged...
Will post more tomorrow and include some pictures that
might help others if they encounter this problem...
Side note: The $12 parts I ordered somehow are mailed
from China. Did not look like that on the web site. I
thought they were USA. They are still hung up in China
presumably due to overly-complicated customs procedures?
So the ones I have with me are from Mouser Electronics.
Three times the price but same-day delivery. I did not
have much choice in this case due to trip scheduling constraints...
The tracking system in china is in KANJI! I installed Chrome
browser because it has an automatic translation facility...
Tracking currently says: 【广州互换局】已封发 which translates to
: " [ Guangzhou ] exchange bureau has issued letters". Been
saying that for several days now. The vendor was:
trade.Aliexpress.com. Use them if you like to save money
and have all the time in the world for delivery... Otherwise
use Mouser Electronics.
(PS: Ordered China parts on 28 March. it is now 13 May and I
still do not have the parts. The tracking site in China now is
showing nothing. Supposedly they have left China and I was
supposed to get a new USA tracking message showing where
they are in the USA. Did not happen. Motorola colleagues say
that is typical and they will show up eventually. )
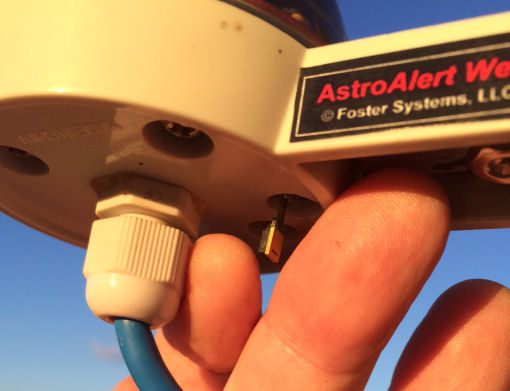
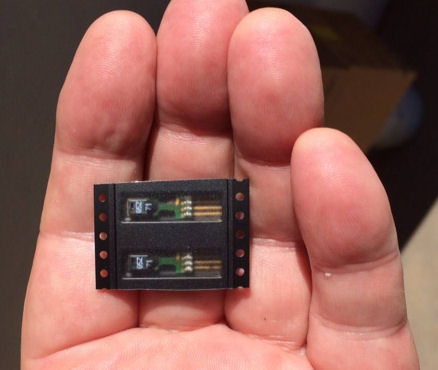
- OK, completed removal of old SHT-71 device and installed new one.
I think the old one was failing and it was not corrosion or disconnectison.
New one is working fine. Photos here show what I did:
The device is that little gold and black thing sticking out of the bottom...
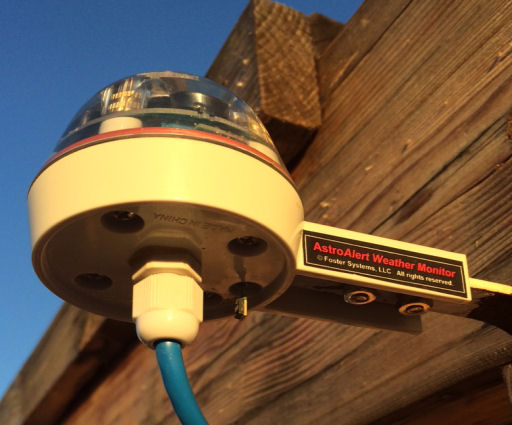
Here it is zoomed in a bit...
SHT-71 devices as received from Mouser Electronics. They are embedded in "tape"
to allow automated machinery to automatically install them on circuit boards. Note
the 4 gold pins. These plug into a 4-pin socket in the AstroAlert device.
After insertion I then tested using the AstroAlert software and it was indicating
that I must have got it socketed correctly![[smile]](Problems_clip_image005.gif "Smile - :)") i.e., it seemed to be working and
i.e., it seemed to be working and
no CRC errors were being signaled. I then used white Silicone compound from a
little tube to secure the thing so it would be held in place and stay socketed.

Then I used Frank's idea of the Blue Hawk Inlet Water Filters to
enclose the device. Might keep it from flopping in the wind? Trimmed it with
scissors to fit properly. Applied silicone to keep it in place hopefully.
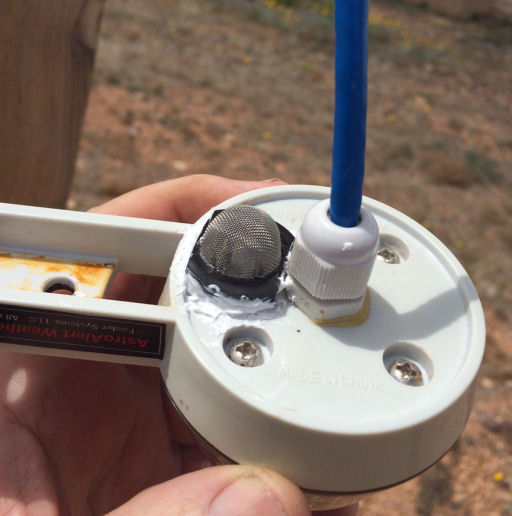
Anyway, AstroAlert software is now working and the humidity displayed seems
to be matching, for the first time, what other systems in our local "telescope farm" at
Rancho Hidalgo are showing.
- Weather monitor started failing in March 2015. Main window
- CGEM mount lost sync with the night sky.
I use a VMWare Virtual Machine (VM) to operate the Takahashi TOA-130 telescope. I am using Celestron's NexRemote software to control a Celestron CGEM mount that the TOA-130 is mounted on.
The virtual machine unaccountably would no longer boot. I still don't know why and tried everything I know to recover it. So I had to create another virtual machine and reinstall all the applications.
In the original VM, I had aligned the scope using NexRemote when I was at the observatory site. That then allowed me to always then use "Last Align" when I initialized NexRemote and the scope was then synced/aligned with the night sky.Note that the alignment data for NexRemote is kept "somewhere" within my computer. It is totally independent of alignment data that is created if you use the CGEM mount's physical hand control paddle in which case it is stored probably within the hand control paddle hardware. (Unlike the Meade LX-200 where the alignment data is kept within the telescope hardware no matter whether you control the scope with the hand control paddle or with third-party software. Recovering alignment of a Meade LX-200 scope is easy. See item 3 on this page listing all problems encountered.)
I still don't know where the NexRemote alignment data is kept. If it is in the registry, I should be able to see where it is stored by using Microsoft's Process Monitor. I would like to be able to save and restore the data if necessary in the future.
Recovering alignment of a Celestron CGEM mount is difficult because you have to go through the CGEM alignment procedure which expects you to be at the scope looking through the eyepieces of the finderscope and the main scope in order to find and center alignment stars in the view field. If you intend to use NexRemote, then you have to use NexRemote to do the alignment procedure. You cannot use the physical hand control paddle...
You normally use the "Two Star Align" procedure.
So the problem was how to do this remotely from 270 miles away without looking through the eyepieces and instead use only the camera.
I use an ST-4000XCM camera with this scope so that meant that that I somehow had to be able to get alignment stars to be centered in the camera's view field. The odds that the first alignment stars will be in the camera field are low.
So here is the procedure I finally came up with. I used it and it worked!REALIGNING THE CGEM MOUNT REMOTELY USING ONLY THE CAMERA
- Open NexRemote.
- Do the initialization steps up to the “Align” step.
- Open TheSkyX Pro.
- Use Telescope -> “Telescope Setup” to choose CGEM 800 Mount
- Set the COM port to the Virtual Port that NexRemote is using
(COM13 in my case.) - “Connect” the telescope in TheSkyX Pro.
- DO NOT USE TheSkyX “Move” controls. (They go nuts.)
- Choose two-star align in the NexRemote hand control display.
- Choose an alignment star.
- The scope will slew to the star and it will be shown in TheSkyX
as a circle around the star showing the supposed telescope position. - Connect your camera in MaximDL.
- Take a 30 second image and do a plate-solve either using Astrometry.net or Maxim DL Analyze->Pinpoint Astrometry. (I was getting plate-solve failures and plate-solve errors which greatly complicated things! SEE BELOW...)
- Plate-solve result should show where the telescope is REALLY pointing.
- Center your image’s center in TheSkyX Pro’s display window.
- Use the NexRemote’s up/down/right/left arrow keys move the
scope to bring the alignment star into the field of view of your scope/camera. (SEE BELOW for more information on this counterintuitive process...) - Use the camera to take another image to see if the alignment star is in the field of view.
- Adjust the position of the telescope using NexRemote's arrow keys and take "continuous" images until the alignment star is precisely centered in the camera view field.
- When the star is centered, continue with the NexRemote alignment procedure i.e., it "Enter" then "Align" keys in NexRemote display.
Repeat from step 9 as needed until alignment is complete.
As indicated above, the main problem was getting plate-solves using 30 second bin 1 images. I tried to use astrometry.net but it kept failing. Failed about 90% of the time for some unknown reason. It is usually very reliable when I give it images taken via AcquireImages from ACP.
Finally realized I could do the plate-solves I needed in Maxim DL using Pinpoint.
I have often used Pinpoint in Maxim DL but usually on images where I was sure of the center. Fortunately, Pinpoint's spiral search usually came up with something eventually.
HOWEVER, some of the Maxim DL plate-solves were in error! I had to look at the "Position Angle" variable in the solution to be sure that it was not providing false values! My camera is about 1 degree off of exact North/South orientation so I could look for that in the plate-solve solution. If the "Position Angle" was correct, then the plate-solve seemed to be correct. Wasted lots of time before I realized that I was getting false plate-solves. (The software seemed so confident in its solutions... :-) ) Played with pinpoint Star Magnitudes setting to try to get better plate-solves.
Once I had a decent plate-solve then I could try to move the telescope so that the target alignment star would be in the camera frame.
The image below from TheSkyX Pro shows the camera image box (the large box) with Regulus outside of the box. When the NexStar alignment procedure is underway with Regulus as the target - and the telescope is connected, then there will be a white circle centered on Regulus showing that the telescope is pointing at Regulus. Except that it is NOT. The plate solve shows that another location is the true center of the view field of the camera. I then moved the map so that the plate-solved coordinates were centered in the camera field as shown below. You can see in the image below that Regulus is then outside of the camera view field box.
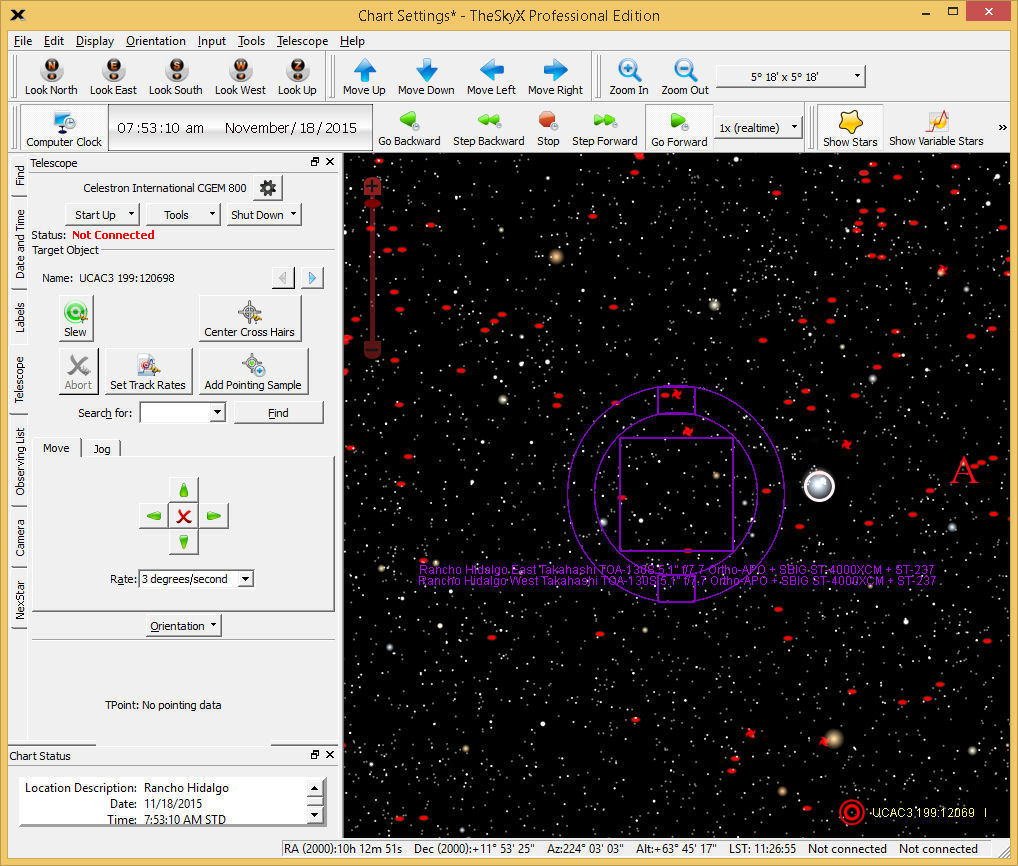
So the problem then is to get Regulus inside the camera view field box.
This is extremely counterintuitive in my opinion (and doubly so for me, a "morning person" trying to figure this out at 1AM) but you want to locate point "A"which is OPPOSITE the center of the camera image box with respect to Regulus. (Opposite horizontally and vertically.)
Then you want to use the NexRemote telescope arrow buttons to move the telescope circle to point "A". That will put Regulus in the camera image field. (Counterintuitive but that is what you need to do...)
Then take "Continuous" 1 second images at bin 4 and use the NexRemote arrow buttons to carefully center the target star (Regulus in this case) in the camera images. Then, when centered, hit NexRemote's "Enter" button then hit NexRemote's "Align" button and you now have the telescope aligned with respect to Regulus.
I then continued to other alignment stars and did each of them as above until I had Celestron's maximum limit of number of stars aligned. Stars after the first couple were extremely easy. They were almost dead center immediately.
That completed the procedure and I am again able to use NexRemote and "Last Align" to have my scope ready and aligned with the night sky...
- trip to observatory 5-10 Jan 2016.
- Meteor camera failed. The best predicted meteor shower of the year was the Geminids on 14 Dec 2015. I fired up HandyAvi and connected to my Watec camera with a wide-angle lens. No picture! It connected but no images were being produced.
Discovered that the power supply for the camera was failing and not producing adequate voltage/current to run the camera. Did not have another power supply. Did have a power supply operating another camera with twice the needed capacity. Cut wires and spliced them so that power supply is now powering two cameras... Everything works...
- Installed Mallincam all-sky camera. It works but only seems to be providing part of the sky. Further study showed that the camera view field is limited and does not do 180 Degrees, i.e., down to the horizon. The MoonGlow camera being used by Bernard does go all the way to the horizon but it is no longer being manufactured - ( http://www.moonglowtech.com/products/AllSkyCam/ ) I wanted to adjust focus of the Mallincam all-sky camera. Top unscrews. Then another sphere inside unscrews. At night I didn't see that there was a set screw so I was unable to adjust the focus. Next morning I moved the camera to a table in the warm-room and I then found the set screw and attempted to refocus on some text that a fellow astronomer at the RH site offered to help with. He held the text up against the roof of the warm-room and I adjusted the focus. Think it is pretty close now. The camera achieves its sensitivity by adjusting the exposure time automatically. Something like 5 or 6 seconds at night...
- Power outage a few weeks ago seemed to cause LX-200 scope to move. I was afraid that the RA motor might have blown out. If the scope is tracking and bumps up into an immovable object (e.g., the rafters of my observatory) then one of the chips on the mother board can blow out. I have only a few of those left so I was worried. Gene put my scope back into park position manually at that time and I left the scope powered down since then because I was not sure if I could get it back into park position if I tried to move it remotely.
Powered up scope and it seemed OK at first then the Declination motor started "running away." This is a known problem with Meade LX-200 Classic scopes and is corrected by tuning a couple of small variable resistors on the motor board. I've done this many times. In this case, since the scope is 270 miles from home, I decided to replace it with one I bought from Meade long ago. This one is pristine supposedly so should not need adjustment for a couple of years or more? Then discovered that it was not the pristine one. So I decided to simply tune the variable resistors on the motor board as I have done in the past. Behavior was restored to normal. Scope is now available for my use.
- Very odd behavior of USB ports on my machine given that all internet documents referring to the number of allowed USB devices is 256. I am running Win8.1 and I ran Windows Update and installed (literally) 276 updates to see if they would have any effect. Updated real machine AND virtual machine... No effect. Maxim DL will show both cameras under normal conditions. I could only see one at a time. If I powered up camera A then powering up camera B would show only A. If I powered up camera B then powering up camera A would show only B.
However if I unplugged just one USB device then I could see both cameras. Didn't matter which device or what kind of device. Keyboard, webcam, whatever... Looks like there is a USB device limit on this machine of about 12 devices! I of course have USB for SBIG cameras, webcams, USB/Serial adapters, etc.
So I was going to leave the keyboard unplugged since I do not need it for Remote Desktop operation. Then I suddenly realized I had a camera looking at the Celestron keypad. That keypad is not in use because I am using NexRemote which is a purely software control package. So I left the keyboard plugged in and I have unplugged the webcam that was
looking at the Celestron keypad.
Now I have control of both cameras.
In the VMWARE virtual machine, I assigned the ST-4000 to the virtual machine. The ST-11000 is now accessible on the "real" machine.
So I believe I now can simultaneously operate both telescopes and cameras, one on the "real" machine and one on the virtual machine...
- Meteor camera failed. The best predicted meteor shower of the year was the Geminids on 14 Dec 2015. I fired up HandyAvi and connected to my Watec camera with a wide-angle lens. No picture! It connected but no images were being produced.
I have my computer connected to my router. My router talks with the Rancho Hidalgo, NM Router. I talk to my observatory computer from my computer in Tempe, AZ using Remote Desktop. Remote Desktop works great! Unless there is a communications slow-down...
I was encountering wildly varying communication speeds. You can determine the speed by using Remote Desktop to access the remote computer (in my case, my observatory computer at Rancho Hidalgo, NM) and running a speed test from that machine. The speed test is at www.speedtest.net. Normally, I should be getting 5 Megabits per second download and 1 Megabits per second upload speeds because those are the speeds that Rancho Hidalgo contracted for via their Internet Service Provider (ISP)... Of course if the speed is too low, you cannot even run the speedtest. But I often could run it and I was sometimes getting upload speeds of .08 Megabits per second which is essentially unusable. The upload speed is what allows the Remote Desktop to show you the screen of the remote computer. If it is too slow, the screen updates cannot occur in a timely manner so you really spend a lot of time waiting.
I was getting extremely poor speeds part of the time. We were unable to determine why.
Eventually, my router failed completely and I could not access my observatory computer.
I replaced my router with a newer router and have not had a problem since.Note that newer routers can be rebooted remotely if you know what you are doing. I have done that on occasion and everything came back up.
However, if you don't know what you are doing, you can cause your system to stop responding to you. It is important to carefully think through anything you are considering doing if you are doing it remotely.
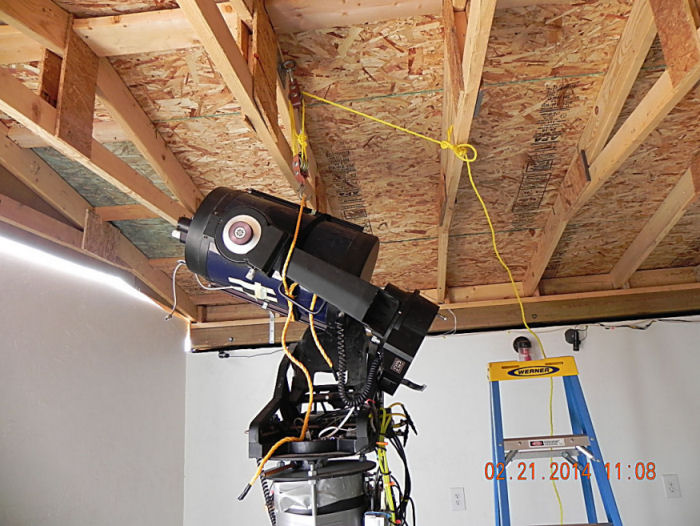
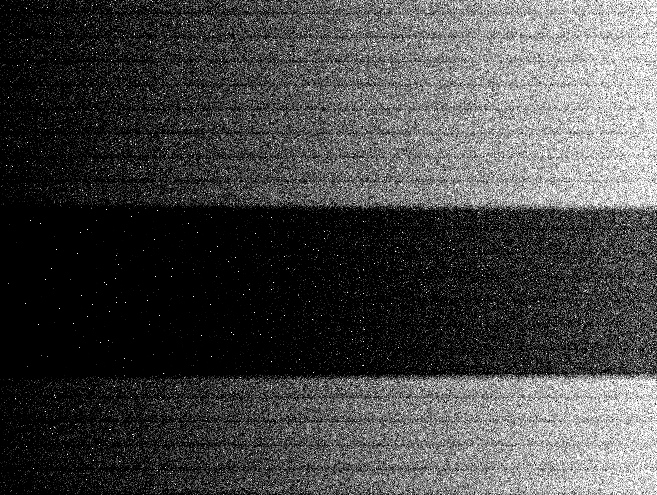
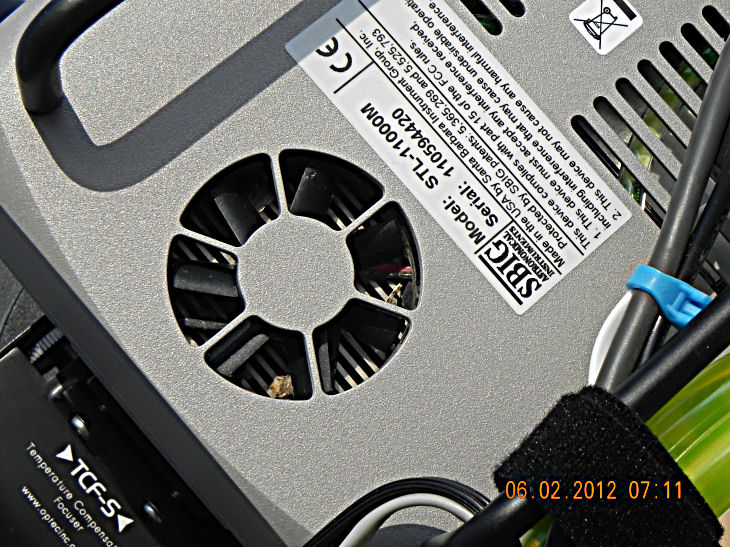
When summer arrived, the temperatures went up so that the ThermoElectric Cooler (TEC) in the ST-11000STL camera could no longer operate at -5 C. About that same time, we began experiencing weird image "banding" (see below) which I was guessing might be caused because of the higher camera temperatures. (Actually, that was not the cause. See "Camera Bug" below. But I made plans immediately to water-cool the camera because I thought the cause might be temperature.) The image banding made imaging impossible because the bands showed up in the images.
Scoured the internet for a solution. Could not imagine having a bucket of water on the floor with a pump feeding the water cooler ports of the camera. Who would fill the bucket? We are 275 miles away from the scope and there is no one there to fill a bucket. I wanted a closed system but nobody seemed to make one for SBIG cameras that was suitable.
A friend at a luncheon I attended suggested that I use a Computer Overclocked CPU chip cooler. PERFECT! The thing is a closed system that pumps water (and antifreeze) through my camera. I had to use connectors to convert from 3/8 inch ID to 1/8 inch ID for the tubing to the camera but that worked.
Tubes from water cooler system to camera. Magnet and sensor are still on the West side in this photo. They were later moved to the East side to protect them from unexpected roof closures.
The camera is now able to go to at least -10C all year long.
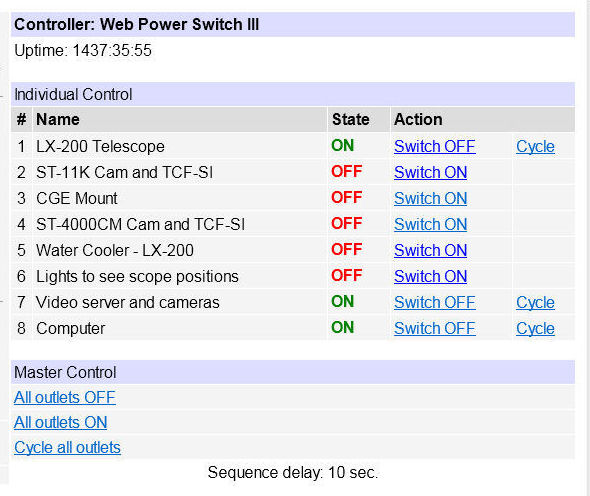
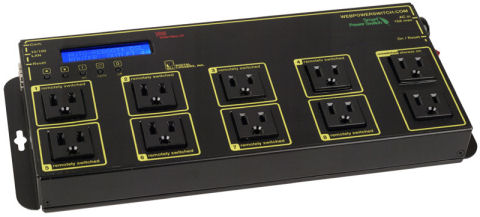
I turn the pump on and off remotely using the Digital Loggers' Web Power Switch III that can turn up to 8 devices on and off:
Guider Image
Guider image
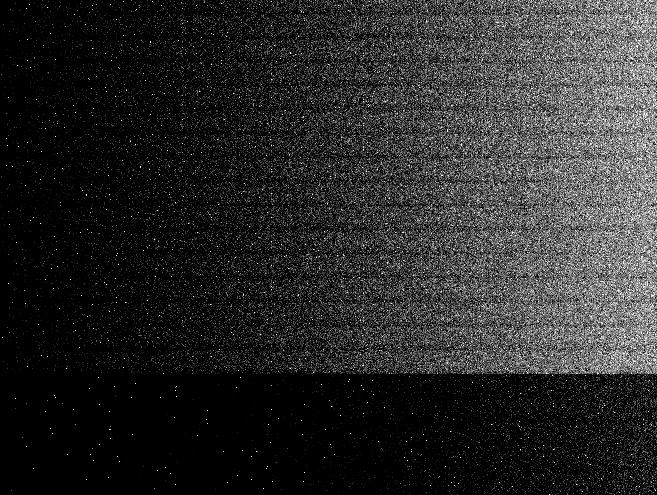
4x4 Binned Main ImageThis is why I made plans to implement water cooling of the camera as shown above.
When I visited my observatory, I installed the water cooling system.
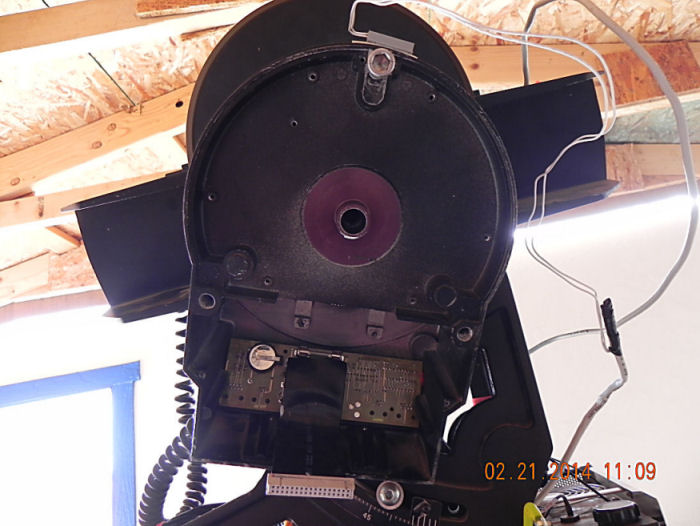
At some point I discovered that if I turned the fan off, the banding went away! I contacted SBIG (manufacturer of my camera) and ordered a new fan and fan capacitor just in case I might need to replace them...
And then I looked carefully at the fan and discovered that the fan could not turn because a big moth had lodged itself where the fan blades could not turn!
Bug at 6 O'Clock
The Bug...The fan would attempt to start turning and get stopped by the bug. The fan would try to start about every half second and make a little clicking noise. The bands appeared to coincide with the rate at which the fan attempted to start up. That is why, when I turned the fan off, the bands stopped happening.
I carefully extricated the bug from the fan assembly and did more testing. Fan ran just fine. No more image banding!
Then I mounted some screenwire over the fan opening to prevent future bugs:
Bug Screen...Comment from SBIG after I shared all this with them:
"Bugs in the fan are not a common problem so sorry I did not think of it. The filter capacitor will keep the fan from "kicking back' voltage into the circuit if the fan is blocked."
Well one would hope so but I don't think the filter capacitor is sufficient to stop the banding... It did not seem to prevent the banding I was experiencing.


Looked like the LX-200 got into tracking mode somehow and stalled by pushing camera up against the roof while the roof was closed. I assumed RA motor caused a fuse to blow.
Yep. A fuse was blown. The one behind the power board. Replaced fuse. Scope powered up but did not initialize. I did not hear the RA motor run to seek its proper position apparently because it was not doing it. The first thing the Meade does during initialization is move the RA motor to determine some sort of magnetic position. If that does not happen, initialization does not complete and all you see n the Keypad is "Meade" indefinitely... Removed power.
So to get at the RA motor, I had to lift the telescope. I used the pulley system I devised some time ago to save my back.
Lifted the scope. Took off the bottom plate. Disconnected the RA motor and tried a spare by plugging in in and letting it dangle.
Powered up. Still no RA motor activity.
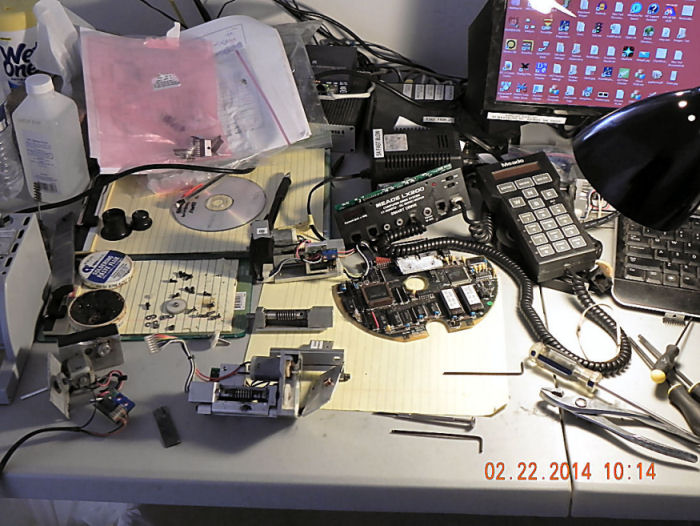
So then I knew U17 (L2724 chip) on the mother board must be blown. I have spares. Removed mother board and took it to workbench.
Unsoldered U17 and soldered in a new one.
Reinstalled everything in the Meade housing. Used original motor. Replugged all connectors, put base back on and tightened all screws.
Then tried a test. RA motor moved a little then a pop and the smell of something burning. U17 had blown again.So removed mother board again and removed the RA motor. I used a power supply, keypad, and power panel I had brought with me from another scope so I could bench test using those and the mother board and the RA motor. Replaced U17.
Bench test worked! I reassembled everything in the Meade housing, powered up, RA motor moved then - Pop - U17 had blown out again! Replaced it...
Definition of insanity: trying the same thing the same way multiple times and expecting the results to be different.
Was not clear for a couple of more tries that the bench tests were always going to work but when everything was assembled in the Meade housing that U17 was always going to blow...
Then I checked voltage between power panel ground and the RA motor metal. Saw 10 Volts! Should be nothing there. Reseated connector of the tiny motor board. 10 Volts went away! I thought I had it. Carefully cleaned connector and by then it was too late to continue.
In the morning, I bench tested then reassembled everything knowing that it would work this time and that I had found the problem and that it was merely the connector not seating properly. Powered up and... Pop... This was getting to be ridiculuous... Replaced U17 again.
Talked to Gene and Bob. They came out to look at bench test. I took voltage readings while Gene did short presses of the East button. As the RA motor arrived at different positions so did the voltage between the motor metal and the Power panel ground! Again occasionally saw the 10 Volt offset. Sometimes 7 volts, sometimes 0, etc.
So the problem HAD to be in the tiny motor on the RA motor/gear/tiny board subsystem! It must be intermittently shorting out voltage to its case and blowing out U17 whenever I put everything back together in the telescope housing. Probably could have causes U17 to blow during bench test if I had connected a wire from the motor housing to ground...
No way to replace the tiny motor itself. Wanted to use the spare RA motor but found that the swivel platform on it was slightly different. Finally switched swivel platforms so I could use the presumably good motor system.
That was a 2 hour job involving disassembly of the gear boxes of two motors and removal of a large gear to get at the bolts holding the worm gear! Then I could just barely get the swivel platforms switched. Fortunately the encoder wheels and masks stayed put...
(Note worm gear separated from motor assembly. This was necessary in order to switch swivel platforms... This is my bench test area. Pretty cluttered since I was working on the motors to switch swivel platforms.)Bench tested new motor. Worked fine.
Reassembled everything in Meade housing. Almost afraid to try it. It worked.
Scope restored to working condition.
2 day job that I originally thought would only involve replacing a fuse!
These are the blown chips I replaced before I figured this out:
These are really hard to come by so this did not make me happy... Still have a small supply which I will hoard... :-)